
스프링 시큐리티 - OAuth2 테스트 케이스 유연하게 작성하기
스프링 시큐리티로 구현한 OAuth2 인증, 인가 테스트 케이스를 구현하는 방법들에 대해 정리해보았다.
개요
요즘 OAuth2.0 인증을 스프링 시큐리티에 사용하는 것을 공부하고 있다. OAuth2 설정 관련 내용은 잘 정리된 블로그들이 많으므로 따로 글로 작성하려고는 하지 않았다.
하지만 스프링 시큐리티를 적용하면서 기존에 사용하던 테스트 클래스들이 제대로 작동하지 않는 부분(특히 인증, 인가)들이 있어서 관련 정보들을 찾아보았고 스프링 공식 문서에서 제공하는 방법들에 대해 정리를 해보려고 한다.
- 인가 권한 클래스
@Getter
@RequiredArgsConstructor
public enum Role {

    ADMIN("ROLE_ADMIN", "관리자"),
    GUEST("ROLE_GUEST", "손님"),
    USER("ROLE_USER", "사용자");

    private final String key;
    private final String title;
}
- 시큐리티 설정 클래스
@Configuration
@EnableWebSecurity
public class SecurityConfig extends WebSecurityConfigurerAdapter {

    @Autowired
    private CustomOAuth2AccountService customOAuth2AccountService;

    @Override
    protected void configure(HttpSecurity http) throws Exception {
        http
                .authorizeRequests()
                .antMatchers("/login", "/resources/**", "/error")
                .permitAll()
                .antMatchers("/posts/**")
                .hasRole(Role.GUEST.name())
                .anyRequest()
                .authenticated()
        ;
        http
                .logout()
                .logoutSuccessUrl("/login")
        ;
        http
                .oauth2Login()
                .userInfoEndpoint()
                .userService(customOAuth2AccountService)
        .and()
                .defaultSuccessUrl("/posts")
        ;
    }
}
- 서비스 클래스
@Service
@Transactional
@RequiredArgsConstructor
public class PostServiceImpl implements PostService {

    private final PostRepository postRepository;

    @Override
    public Post save(Post post) {
        return postRepository.save(post);
    }

    @Override
    public Post edit(Post post) {
        return postRepository.save(post);
    }

    @Override
    public void delete(Post post) {
        postRepository.delete(post);
    }

    @Override
    public Optional<Post> getOnePost(Long id) {
        return postRepository.findById(id);
    }

    @Override
    public List<Post> getAllPosts() {
        return postRepository.findAll();
    }
}
- 컨트롤러 클래스
@Controller
@RequiredArgsConstructor
public class PostController {

    private final PostService postService;

    @GetMapping("/posts")
    public String posts(Model model) {

        List<Post> posts = postService.getAllPosts();

        model.addAttribute("posts", posts);

        return "posts";
    }

    /* post, save, edit 등 생략 */
}
위와 같이 간단한 컨트롤러에 여러 가지 테스트 케이스를 적용해보았다.
스프링 MVC 보안 테스트
스프링 시큐리티 테스트를 위한 의존성은 아래와 같이 추가해 주면 된다.
testImplementation 'org.springframework.security:spring-security-test'
먼저 테스트를 위한 PostControllerTest 클래스를 다음과 같이 생성했다.
// 1
@WebMvcTest(controllers = PostController.class)
// 2
@MockBeans({
        @MockBean(JpaMetamodelMappingContext.class),
        @MockBean(PostService.class),
        @MockBean(CustomOAuth2AccountService.class)
})
class PostControllerTest {

    // 3
    @Autowired
    private MockMvc mvc;

}
-
@WebMvcTest를 통해 테스트할 컨트롤러를 지정한다.@SpringBootTest어노테이션은 스프링 부트에서 관리하는 모든 빈들을 생성한 후에 테스트를 실행하기 때문에 테스트에 많은 시간이 소요되며, 단위 테스트에서는 적절하지 않다.@WebMvcTest어노테이션은 웹과 관련된 빈들만 생성해줘서 비교적 가볍다. -
@MockBeans,@MockBean을 통해 필요한 빈들을 생성한다. 앞서 말했듯이@WebMvcTest에서 테스트에 필요한 모든 빈들을 생성해 주지 않기 때문에@MockBean어노테이션을 통해 필요한 빈들을 목업 해줄 수 있다.JpaMetamodelMappingContext의 경우@JpaEnableJpaAuditing을 추가한 경우에만 목업 해주면 된다. -
MockMvc클래스를 통해 스프링 MVC의 동작을 재현할 수 있다.
테스트 케이스 작성(GET)
import static org.springframework.test.web.servlet.request.MockMvcRequestBuilders.get;
import static org.springframework.test.web.servlet.result.MockMvcResultMatchers.status;

@Test
void posts() throws Exception {
    mvc.perform(get("/posts"))
            .andExpect(status().isOk());
}
url 템플릿을 설정하여 원하는 페이지를 GET 혹은 POST로 테스트하는 것이 가능하며 .andExpect(), andReturn() 으로 원하는 결과를 확인할 수 있다.
위에서 작성한 테스트를 실행하면 302 에러가 발생한다.
MockHttpServletResponse:
           Status = 302
    Error message = null
          Headers = [X-Content-Type-Options:"nosniff", X-XSS-Protection:"1; mode=block", Cache-Control:"no-cache, no-store, max-age=0, must-revalidate", Pragma:"no-cache", Expires:"0", X-Frame-Options:"DENY", Location:"http://localhost/login"]
     Content type = null
             Body =
    Forwarded URL = null
   Redirected URL = http://localhost/login
          Cookies = []

java.lang.AssertionError: Status expected:<200> but was:<302>
Expected :200
Actual   :302
스프링 시큐리티의 설정대로 인증받지 않은 사용자에 대해 로그인 페이지로 리다이렉트 된 것을 확인할 수 있다.
다음부터는 여러 가지 방법을 통해 Authentication 객체를 가진 사용자를 통해 테스트해보려고 한다.
@WithMockUser
가장 간단한 방법은 @WithMockUser 어노테이션을 사용하는 것이다.
username, roles, authorities, password 파라미터를 통해 임의로 목업된 인증 받은 유저를 사용하여 컨트롤러를 테스트해볼 수 있다.
@Test
@WithMockUser(username = "guest", roles = {"GUEST"})
void posts() throws Exception {
    mvc.perform(get("/posts"))
            .andExpect(status().isOk());
}
디버깅 결과
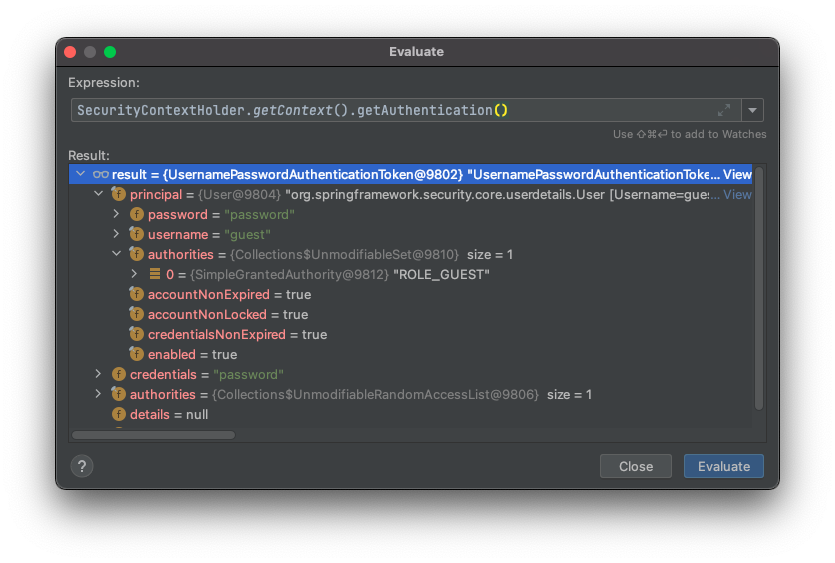
⬆ UsernamePasswordAuthentication 클래스가 인증 객체로 생성되었다.
ROLE_GUEST를 가진 사용자에 대해 성공적으로 인가 처리되었다. 하지만 위 사진과 같이 @WithMockUser 어노테이션을 통해 생성된 인증 토큰은 기본적인 Form 인증 방식의 UsernamePasswordAuthenticationToken 인 것을 확인할 수 있다.
OAuth2 인증 방식에서 생성되는 OAuth2AuthenticationToken 인증 객체를 테스트 케이스에서 사용하려면 다른 방법이 필요하다.
커스텀 어노테이션 생성
첫 번째 방법은 OAuth2 인증 객체 생성을 위한 커스텀 어노테이션을 만드는 것이다.
정확히는 테스트에 사용할 커스텀 SecurityContext 자체를 생성해 주는 것이다. 때문에 간단하게 해결하려면 두 번째 방법을 참고할 것!
- 임의의 WithMockCustomOAuth2Account 어노테이션 생성
@Retention(RetentionPolicy.RUNTIME)
@WithSecurityContext(factory = WithMockCustomOAuth2AccountSecurityContextFactory.class)
public @interface WithMockCustomOAuth2Account {

    String username() default "username";

    String name() default "name";

    String email() default "my@default.email";

    String picture() default "https://get_my_picture.com";

    String role() default "ROLE_USER";

}
먼저 테스트 케이스에 사용할 시큐리티 컨텍스트 어노테이션을 선언해준다. 자신이 생성할 인증 객체의 Attributes 를 임의로 설정해주면 된다. 위의 경우는 Google OAuth2 에서 간단하게 제공되는 유저의 데이터들을 명시해줬다.
다음은 시큐리티 컨텍스트를 생성하는 Factory 구현체를 생성해야 한다.
- WithMockCustomOAuth2AccountSecurityContextFactory 클래스 생성
public class WithMockCustomOAuth2AccountSecurityContextFactory
    implements WithSecurityContextFactory<WithMockCustomOAuth2Account> {

    @Override
    public SecurityContext createSecurityContext(WithMockCustomOAuth2Account customOAuth2Account) {

        // 1
        SecurityContext context = SecurityContextHolder.createEmptyContext();

        // 2
        Map<String, Object> attributes = new HashMap<>();
        attributes.put("username", customOAuth2Account.username());
        attributes.put("name", customOAuth2Account.name());
        attributes.put("email", customOAuth2Account.email());
        attributes.put("picture", customOAuth2Account.picture());

        // 3
        OAuth2User principal = new DefaultOAuth2User(
                List.of(new OAuth2UserAuthority(customOAuth2Account.role(), attributes)),
                attributes,
                customOAuth2Account.name());

        // 4
        OAuth2AuthenticationToken token = new OAuth2AuthenticationToken(
                principal,
                principal.getAuthorities(),
                customOAuth2Account.registrationId());

        // 5
        context.setAuthentication(token);
        return context;
    }
}
WithSecurityContextFactory<A extends Annotation> 인터페이스를 구현하는 커스텀 Factory 클래스를 생성해주었다.
-
가장 먼저 비어있는 SecurityContext를 생성해주었다.
-
유저의 고유 데이터를 담는 Map 객체를 정의해주면 된다.
-
앞에서 생성한 attributes와 인가 권한, nameAttributeKey 값으로 OAuth2User 객체를 생성했다.
-
우리가 필요로 했던 OAuth2 인증 토큰을 생성해주었다. 이때 registrationId는 OAuth2 인증 서버의 고유한 이름이다.
-
인증 토큰을 SecurityContext에 담고 리턴
테스트 케이스에 커스텀 어노테이션 사용
@Test
@WithMockCustomOAuth2Account(role = "ROLE_GUEST", registrationId = "google")
void posts() throws Exception {
    mvc.perform(get("/posts"))
            .andExpect(status().isOk());
}
디버깅 결과

⬆ SecurityContext에
OAuth2AuthenticationToken를 담고있는 것을 확인할 수 있다!
더 간단한 방법
스프링 시큐리티 테스트 라이브러리에서는 조금 더 간단한 방법을 제공한다.
SecurityMockMvcRequestPostProcessors 클래스의 메소드인 oauth2Login() 을 이용하면 된다.
해당 클래스는 OAuth2 뿐만 아니라 스프링 시큐리티에서 지원하는 다양한 인증 처리 방식들을 테스트하기 쉽도록 제공한다.
csrf(), x509(), jwt(), anonymous(), oidcLogin(), oauth2Login() 등의 메소드를 사용하여 간단히 원하는 인증 방식으로 테스트가 가능하다.
oauthLogin() 메소드 사용
@Test
void posts() throws Exception {

    mvc.perform(get("/posts").with(oauth2Login()))
            .andExpect(status().isOk());
}
.with(oauth2Login()) 을 통해서 OAuth2 인증 방식 테스트를 할 수 있다.
이대로 실행 시 인증 정보가 OAuth2AuthenticationToken 으로 생성된 것을 확인할 수 있다.
추가적인 인가 처리를 위해서 아래와 같이 설정이 가능하다.
@Test
void posts() throws Exception {

    mvc.perform(get("/posts")
            .with(oauth2Login()
                    // 1
                    .authorities(new SimpleGrantedAuthority("ROLE_GUEST"))
                    // 2
                    .attributes(attributes -> {
                        attributes.put("username", "username");
                        attributes.put("name", "name");
                        attributes.put("email", "my@email");
                        attributes.put("picture", "https://my_picture");
                    })
            ))
            .andExpect(status().isOk());
}
-
.authorities를 통해GrantedAuthority인터페이스를 구현하는 인가 권한 객체를 파라미터로 전달하였다. -
.attributes를 통해 유저의 attributes를 임의로 지정이 가능하다. 이때 Consumer 패턴을 사용하므로 람다 형식으로 값을 넘기면 된다.
디버깅 결과

⬆ 임의로 설정한 attributes로 OAuth2AuthenticationToken이 생성되었다.
테스트 케이스 작성(POST)
앞에서 구현한 커스텀 SecurityContext Factory를 이용하여 테스트 케이스를 작성했다.
컨트롤러
@PostMapping("/posts/save")
public String save(@RequestBody Post post) {

    if (post.getId() != null) {
        Post before = postService.getOnePost(post.getId()).get();
        post.setCreatedAt(before.getCreatedAt());
    }

    postService.save(post);

    return "redirect:/posts";
}
테스트
import static org.springframework.test.web.servlet.result.MockMvcResultMatchers.*;
import static org.springframework.security.test.web.servlet.request.SecurityMockMvcRequestPostProcessors.*;

@Test
@WithMockCustomOAuth2Account(registrationId = "google", role = "ROLE_GUEST")
void newPost() throws Exception {

    ObjectMapper objectMapper = new ObjectMapper();

    // 1
    Post post = Post.builder()
            .title("testTitle")
            .author("username")
            .content("postContent")
            .build();

    mvc.perform(post("/posts/save")
            // 2
            .with(csrf())
            // 3
            .content(objectMapper.writeValueAsString(post))
            // 4
            .contentType(MediaType.APPLICATION_JSON))
            .andDo(print())
            // 5
            .andExpect(redirectedUrl("/posts"));
}
-
컨트롤러에서 JSON 데이터를
Post클래스로 매핑하기 때문에 save를 위한 객체를 생성 -
csrf 공격 방지를 위한 헤더 추가 // 없으면 403 에러
-
ObjectMapper클래스를 이용하여 객체 데이터 직렬화 수행한 후 content에 담음 -
POST 요청 데이터 타입 명시
-
컨트롤러의 리턴 형식인 redirectUrl 검증
.andExpect 검증의 경우 status().isOk(), status().isNotFound(), model(), view(), content() 등의 방식으로 다양하게 검증이 가능하다.
디버깅 결과

⬆ @RequestBody Post 객체가 정상적으로 매핑되었다.
ModelAndView:
        View name = redirect:/posts
             View = null
            Model = null

FlashMap:
       Attributes = null

MockHttpServletResponse:
           Status = 302
    Error message = null
          Headers = [Content-Language:"en", X-Content-Type-Options:"nosniff", X-XSS-Protection:"1; mode=block", Cache-Control:"no-cache, no-store, max-age=0, must-revalidate", Pragma:"no-cache", Expires:"0", X-Frame-Options:"DENY", Location:"/posts"]
     Content type = null
             Body =
    Forwarded URL = null
   Redirected URL = /posts
          Cookies = []
정상적으로 리다이렉트 되는 것을 확인할 수 있다!
참고로 repository의 save 이후에도 id, createdAt, lastModifiedAt 값이 null로 나오게 되는데 이는 @WebMvcTest 로 수행되는 테스트는 JPA 생성과 관련된 기능이 전혀 존재하지 않는 테스트 어노테이션이기 때문이다.

댓글남기기